Git Basics: Your First Commit and Sync to GitHub
📝 Course Notes
Key takeaways from this lesson:
What You'll Be Able to Do
- Turn a regular folder into a Git repository (with commits and history)
- Understand
git statusand know which changes will be committed - Push code to GitHub and merge using PR
- Know where OpenCode uses Git (e.g.,
/undo)
Your Current Struggle
- You broke a file and want to go back to "it was working a moment ago," but can only rely on copy-paste
- You hear people say "submit a PR" and know it's important, but don't know where to start
- You feel nervous when OpenCode modifies code: afraid AI will change too much at once, and you won't know how to roll back
When to Use This
- When you're starting a project you want to "maintain seriously" (even if it's personal)
- When you need to sync local code to GitHub or collaborate with others
- When you want OpenCode's undo/rollback to be more reliable (especially for file modifications)
🎒 Before You Start
- [ ] Have a local project folder (new or existing)
- [ ] Git installed (install below if not)
- [ ] A GitHub account, able to create an empty repository
First, verify Git is available:
git --versionIf you see "command not found," install by system:
brew install gitsudo apt update && sudo apt install -y gitwinget install --id Git.Git -eCore Concept
Git does three things:
- Record snapshots: Save the "current code state" with a name (commit)
- Compare changes: You can see "what changed" at any time
- Sync and collaborate: Push your commits to remote (GitHub), or pull others' commits
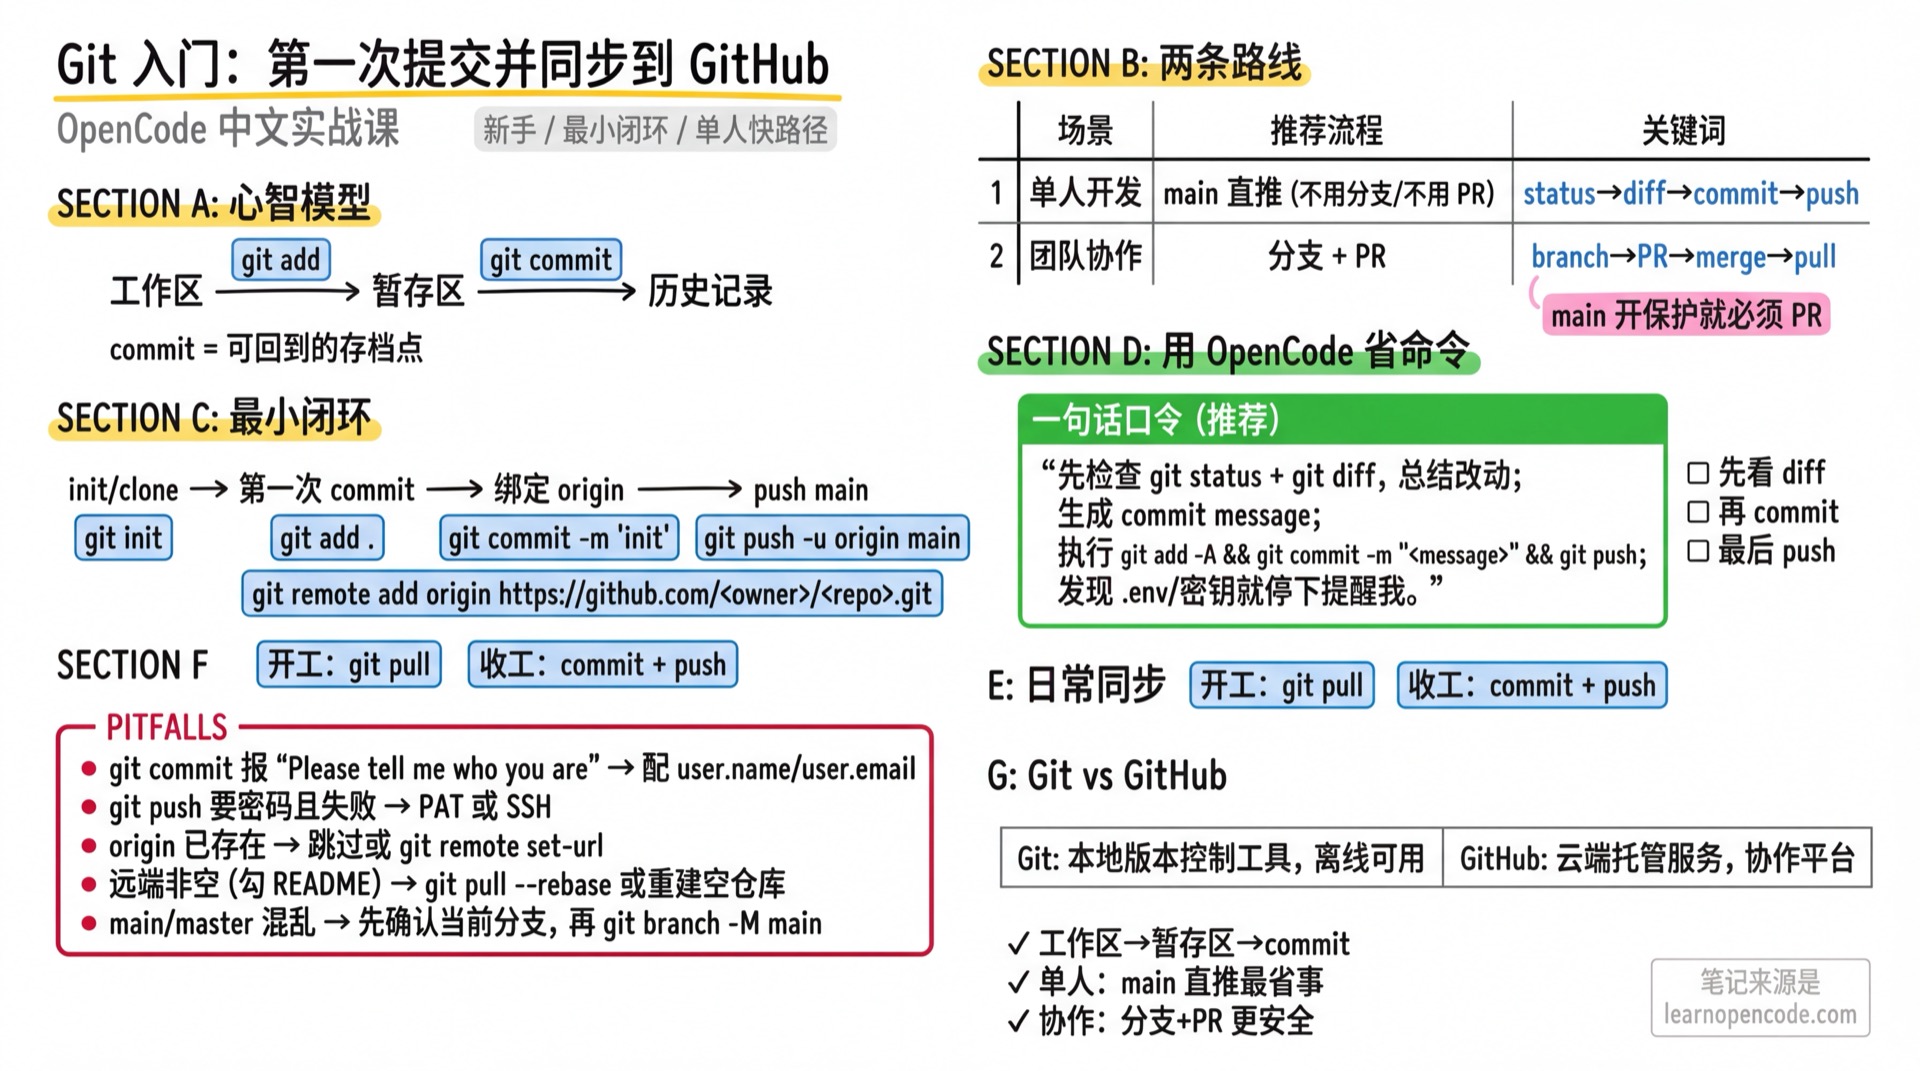
The key mental model is this diagram:
Working Tree
  |  git add
  v
Index (Staging Area)
  |  git commit
  v
Commits (History)
What do these three terms mean?
- Working Tree: The folder you're editing (the files you see)
- Index (Staging Area): The set of changes you've "selected to commit" (not yet in history)
- Commit: A "snapshot you can return to." Each commit should explain "what I did / why I did it"
What's the difference between Git and GitHub?
- Git: A version control tool that runs on your computer.
- GitHub: A website that hosts Git repositories. You can push local repos there and collaborate with others.
Next, you'll run through a "minimal loop": initialize repo → first commit → push to GitHub.
Then you'll learn two paths:
| Your situation | Recommended approach | Key commands to remember |
|---|---|---|
| Working alone (personal project / small tool) | Commit and push directly on main (no branching, no PR needed) | status → diff → commit → push |
| Collaborating (multi-person / CI / code review) | Branch + PR | branch → PR → merge → pull |
OpenCode's approach
You don't need to memorize a bunch of Git commands. A more practical approach:
- Let OpenCode first show you a summary of changes (based on
git status/git diff) - Then let it generate a commit message and execute
add/commit/push
Follow Along
You can run these commands in OpenCode
In OpenCode's TUI input box, prefix commands with ! to execute them (e.g., !git status). If you prefer a regular terminal, that works too.
Step 1: Introduce yourself to Git (one-time setup)
Why Commits record author information; otherwise your first commit will likely error.
git config --global user.name "Your Name"
git config --global user.email "[email protected]"

# Verify
git config --global --get user.name
git config --global --get user.email
You should see: The last two lines output the name and email you just configured.
Note for company projects
If you're on a company computer, use your company email; for personal projects, use your personal email.
Step 2: Create a repository (choose init or clone)
Why Without a repository (.git directory), Git has no "history" to record.
# Navigate to your project directory
cd /path/to/your/project

# Initialize repository
git initgit clone https://github.com/<owner>/<repo>.git
cd <repo>You should see: git init will indicate repository initialized; git clone will download the code locally.
Add a .gitignore (to avoid committing generated files, caches, secrets):
# Dependencies and build outputs
node_modules/
dist/
build/

# Logs
*.log

# Local environment variables (don't commit to repo)
.env
.env.local

# System/editor misc
.DS_Store
.idea/
Don't want to write it yourself? Let OpenCode help
You can just say one sentence and let OpenCode generate/update .gitignore based on the current project and git status:
Check which files shouldn't be committed and add them to .gitignore.

Requirements:
1) First run and reference git status / git diff (just look, don't commit/push directly)
2) Only modify/create .gitignore, then show the content and explain why each entry should be ignored
3) If you find .env, secrets, tokens or similar sensitive files, stop and warn me first
A common beginner trap with .gitignore
.gitignore only works for files "not yet tracked by Git."
If you've already committed a file, adding it to .gitignore won't remove it. The correct approach is to first remove it from Git tracking (but keep the local file), then commit:
git rm --cached <file>
git commit -m "chore: stop tracking <file>"
If that file contains secrets/passwords, don't just do rm --cached - you also need to immediately revoke and regenerate the secret on the corresponding platform.
If you already have a project-specific .gitignore
Keep your existing content; don't force it to match this one.
Step 3: Make your first commit
Why The first commit is like "save point 0." From this moment, you can always return to this state.
# Check current status
git status

# Add changes to staging area (first time usually add all)
git add .

# Commit
git commit -m "init"
You should see: git status changes from a bunch of red "untracked/modified" to "working tree clean."
Check the commit history:
git log --oneline -5You should see: A line with init (preceded by a short hash).
Step 4: Push local repo to GitHub (first sync)
Why Git history is on your local machine; only after pushing to GitHub do you have "remote backup + collaboration entry point."
Create an empty repository on GitHub (recommend not checking README / .gitignore, keep it empty).
Confirm which branch you're on:
git branch --show-currentIf you see master, consider renaming it to main:
git branch -M main- Connect remote and push
main:
git remote -v

# If you initialized with git init: add origin
# If you cloned from GitHub: origin usually exists, skip this line
git remote add origin https://github.com/<owner>/<repo>.git

# Ensure you're on main before pushing
git checkout main
git push -u origin main
You should see: The main branch appears on your GitHub repository page.
If push asks for password
GitHub no longer supports password authentication for pushes. You need to:
- Use HTTPS: Use a Personal Access Token (PAT) when prompted for credentials
- Or use SSH: Add your SSH key to GitHub
This is GitHub account configuration, unrelated to OpenCode; if stuck, follow GitHub's prompts.
Step 5: Solo development workflow (no branching, no PR)
Why When working alone on a project, "branch + PR" is optional. The most reliable rhythm is: after completing a small feature, save a rollback point (commit), then push to GitHub.
You just need to give OpenCode a command (one-liner version):
Summarize the changes, commit and push.Want to be safer (recommended)
If you don't want to "blind push," use this (also short, but safer):
First check git status + git diff, summarize changes and give me a commit message;
I'll confirm before you execute commit and push.

Note: If you find .env, secrets, tokens or similar files, stop and warn me first.
If you prefer a more hands-on approach, you can also run key commands with !:
git status
git diff
You should see:
- OpenCode first summarizes changes, then provides a commit message
- After successful push, you can see the latest commit on GitHub
Is it risky to let it push with one sentence?
Yes, that's why the pattern is: first status/diff, then commit/push. You always retain the final opportunity for manual confirmation.
Collaboration path (optional): Branch + PR
Common scenarios where you need this path:
- Your repo has
mainbranch protection (no direct push allowed) - You want CI / code review before each merge
# Create branch and commit
git checkout -b feature/first-change
git add -A
git commit -m "feat: first change"
git push -u origin feature/first-change
Then create a PR on GitHub: base = main, compare = feature/first-change.
After merging, sync locally:
git checkout main
git pull
Step 6: Keep local and GitHub in sync
Why Whenever your code changes on GitHub (you pushed from another computer, merged a PR, or someone else pushed), you need to pull updates locally.
Recommended habit:
- Start work:
pull - Finish work:
commit + push
git checkout main
git pull
(Optional) Delete local branch:
git branch -d feature/first-changeYou should see: git log --oneline -5 includes the commit you just merged via PR.
What /undo can (and can't) do
/undoreverts "file changes caused by the most recent message."- It's not
git reset- it won't undo commits you've already made or history you've already pushed.
If you've already git commit, use a new commit to fix it; if you've already git push, be careful about rewriting history.
Checklist ✅
- [ ]
git statusshowsworking tree clean - [ ]
git log --oneline -5shows at least 2 commits - [ ]
git remote -vshowsoriginpointing to your GitHub repo - [ ] You can see the latest commit on GitHub (if you went the PR route, you can also see the PR)
- [ ] Running
git pulllocally doesn't error and shows up to date or pulls new commits
Common Pitfalls
| Symptom | Cause | Solution |
|---|---|---|
git commit says "Please tell me who you are" | Author info not set | Configure user.name / user.email per Step 1 |
git status shows many files, afraid to commit | Don't know which should go in repo | First write .gitignore, then confirm with git status |
git push asks for password and fails | GitHub disabled password pushes | Use PAT (HTTPS) or SSH key |
| Remote default branch is wrong (main/master confusion) | Inconsistent branch naming | First git branch --show-current to confirm you're on master, then git branch -M main, then push main |
Accidentally committed .env | .gitignore not written, or written after commit | Immediately delete and regenerate secrets; then handle repo history (don't delay) |
git remote add origin says already exists | You cloned from GitHub | Skip adding; to change URL use git remote set-url origin <url> |
| You checked README on GitHub, push shows conflict | Remote isn't empty | Easiest: create a new empty repo; or follow prompts to git pull --rebase then push |
| You want to push main directly but get rejected | Repo has branch protection | Use "branch + PR" path, or adjust repo rules |
Lesson Summary
You learned:
- Git's three-stage workflow: Working Tree → Index → commit
- How to make a "reviewable change" with branch + PR
- How to push local repo to GitHub and keep in sync after merging
Next Lesson Preview
Next, we recommend B3 Documentation and Git.
You'll connect today's Git basics with OpenCode's daily usage:
- Let OpenCode automatically generate commit messages
- Automatically write PR descriptions
- Use
/undo//redoto roll back unsatisfied changes
Appendix: Source Code Reference
Click to expand source code locations
Last updated: 2026-02-06
| Feature | File path | Lines |
|---|---|---|
Execute shell commands with ! prefix in TUI (tip text) | src/cli/cmd/tui/component/tips.tsx | 51-56 |
Project identification: search upward from .git and generate project ID from root commit | src/project/project.ts | 53-110 |
Core of /undo: revert file patches from messages (calls Snapshot) | src/session/revert.ts | 13-76 |
| Snapshot only enabled in Git projects, uses internal git repo to record/restore snapshots | src/snapshot/index.ts | 50-76 |
Snapshot executes git checkout <hash> -- <file> to rollback files | src/snapshot/index.ts | 130-160 |