5.9a Remote Mode Basics
💡 TL;DR: OpenCode supports headless server mode, accessible via Web interface or remote terminal.
📝 Course Notes
Key takeaways from this lesson:
What You'll Be Able to Do
- Run OpenCode as a background service on a server
- Access OpenCode Web interface through a browser
- Connect to OpenCode remotely from any device
- Configure proxies and custom certificates
Your Current Challenges
- Can only use it in a local terminal, want to run it on a server
- Want to access OpenCode via browser or mobile device
- Want to connect remotely from other devices
- Company network has a proxy, can't connect to API
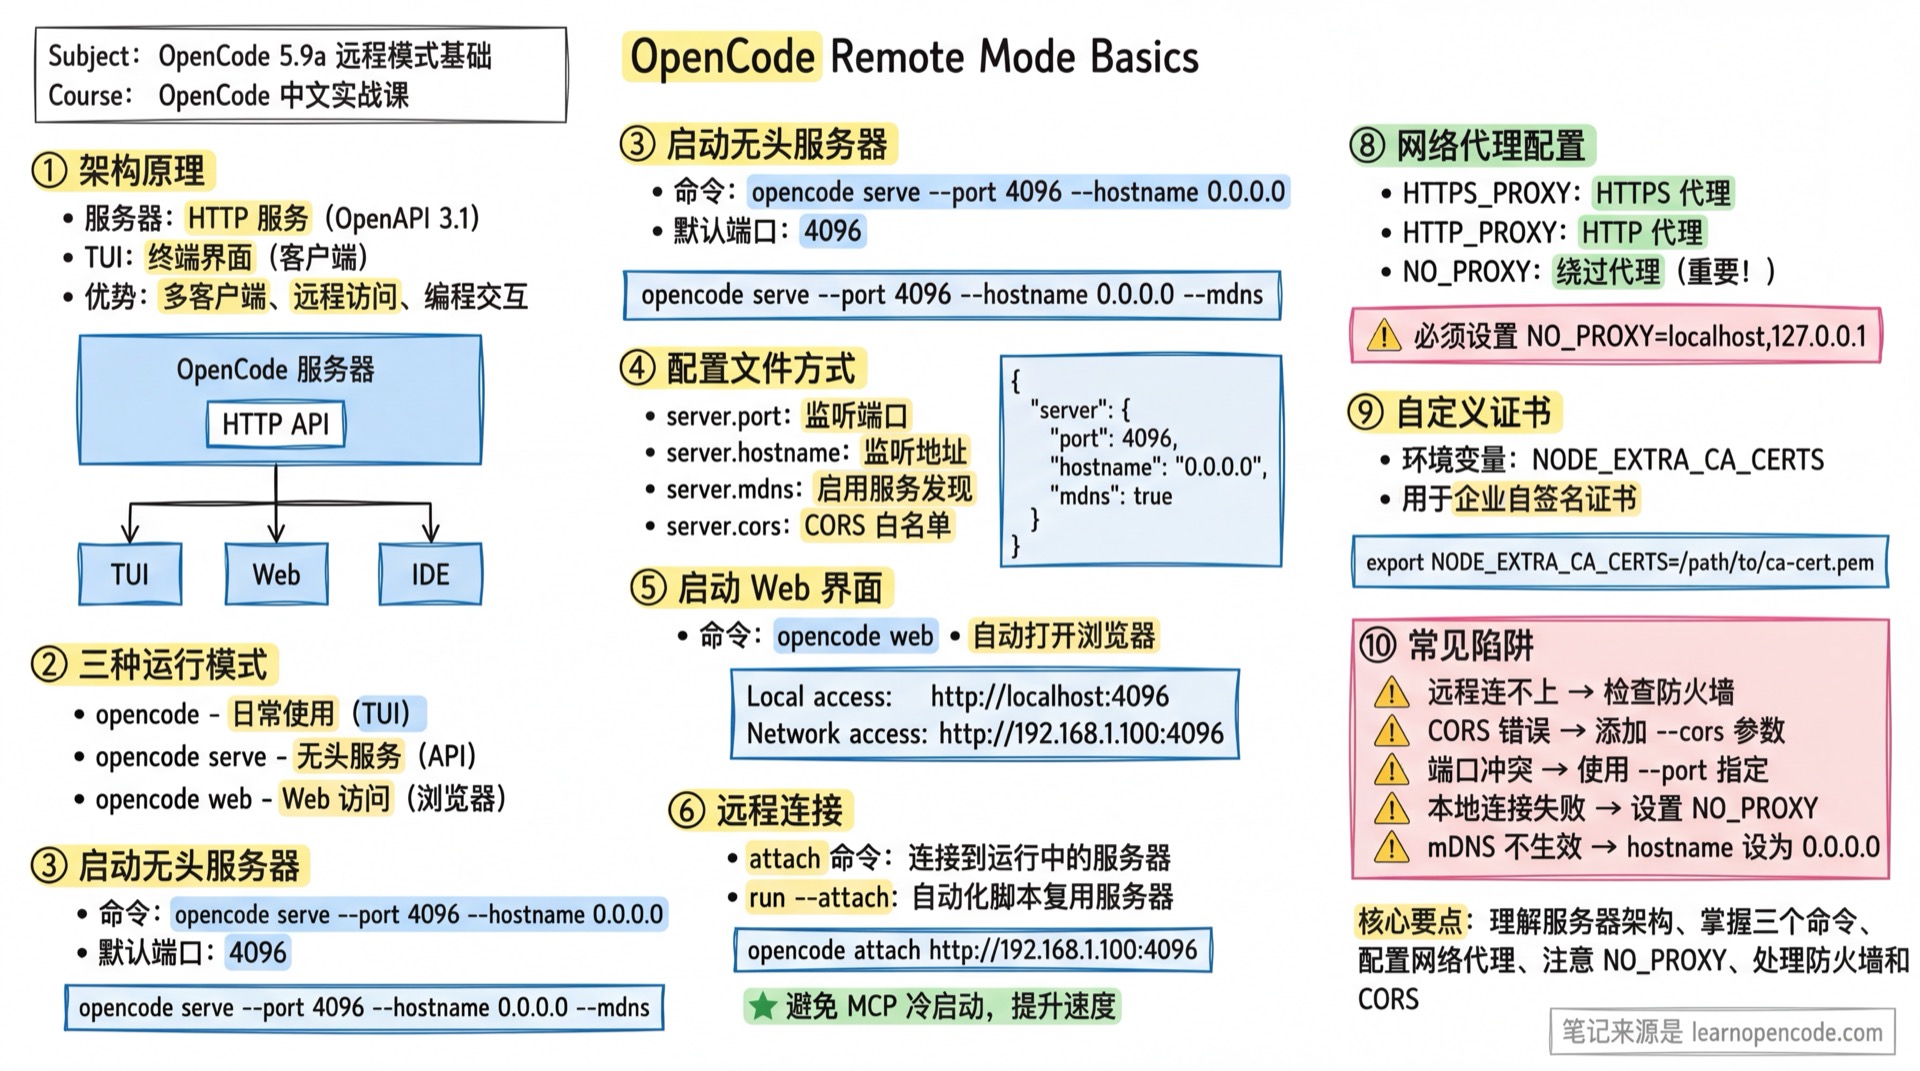
Architecture Overview
When you run opencode, it actually starts two components:
- Server: HTTP service providing REST API with OpenAPI 3.1 specification
- TUI: Terminal User Interface, acting as a client communicating with the server
Benefits of this architecture:
- Supports multiple clients (TUI, Web, IDE plugins) connecting simultaneously
- Enables programmatic interaction with OpenCode
- Supports remote access
┌──────────────────────────────────────────────────────┐
│                  OpenCode Server                     │
│  ┌────────────────────────────────────────────────┐  │
│  │              HTTP API (OpenAPI 3.1)            │  │
│  └────────────────────────────────────────────────┘  │
└──────────────────────────────────────────────────────┘
         ▲              ▲              ▲
         │              │              │
    ┌────┴────┐    ┌────┴────┐    ┌────┴────┐
    │   TUI   │    │   Web   │    │   IDE   │
    └─────────┘    └─────────┘    └─────────┘
Three Running Modes
| Command | Purpose | Interface |
|---|---|---|
opencode | Daily use | TUI (auto-starts local server) |
opencode serve | Headless service | None (pure API service) |
opencode web | Web access | Browser interface |
Starting a Headless Server
Basic Command
opencode serve [--port <number>] [--hostname <string>] [--cors <origin>]Command Line Options
| Parameter | Description | Default |
|---|---|---|
--port | Listening port | 4096 |
--hostname | Listening hostname | 127.0.0.1 |
--mdns | Enable mDNS service discovery | false |
--cors | Additional allowed CORS origins | [] |
Source:
opencode/packages/opencode/src/cli/network.ts:4-26
Examples
# Start with default config (port 4096 or random)
opencode serve

# Specify port and address, allow LAN access
opencode serve --port 4096 --hostname 0.0.0.0

# Allow multiple CORS origins
opencode serve --cors http://localhost:5173 --cors https://app.example.com

# Enable mDNS discovery (automatically sets hostname to 0.0.0.0)
opencode serve --mdns
After starting, it outputs:
opencode server listening on http://0.0.0.0:4096Configuration File Method
Besides command line arguments, you can also set server parameters via configuration file:
// opencode.json
{
  "server": {
    "port": 4096,           // Listening port
    "hostname": "0.0.0.0",  // Listening address
    "mdns": true,           // Enable mDNS
    "cors": [               // CORS whitelist
      "http://localhost:5173",
      "https://my-app.example.com"
    ]
  }
}
Source:
opencode/packages/opencode/src/config/config.ts:701-711
Priority Order: Command line arguments > Configuration file > Default values
Starting the Web Interface
opencode webThis starts the HTTP server and automatically opens the browser to access the Web interface.
Options
Same as the serve command:
| Parameter | Description |
|---|---|
--port | Listening port |
--hostname | Listening hostname |
--mdns | Enable mDNS discovery |
--cors | Additional allowed CORS origins |
LAN Access
When hostname is set to 0.0.0.0, all available access addresses are displayed:
opencode web --hostname 0.0.0.0 --port 4096Output:
  Local access:      http://localhost:4096
  Network access:    http://192.168.1.100:4096
Source:
opencode/packages/opencode/src/cli/cmd/web.ts:41-68
Remote Connection
Using the attach Command
You can connect TUI to a running OpenCode server:
# Terminal 1: Start backend server
opencode web --port 4096 --hostname 0.0.0.0

# Terminal 2: Connect from another machine
opencode attach http://192.168.1.100:4096
attach Options
| Parameter | Short | Description |
|---|---|---|
--dir | Working directory for TUI startup | |
--session | -s | Session ID to resume |
Source:
opencode/packages/opencode/src/cli/cmd/tui/attach.ts:4-31
Using run --attach
The run command also supports connecting to a running server, ideal for automation scenarios:
# Terminal 1: Start headless server
opencode serve

# Terminal 2: Run command via attach (avoids MCP cold start)
opencode run --attach http://localhost:4096 "Explain closures in JavaScript"
The benefit is that each run doesn't need to restart MCP servers, significantly reducing response time.
Source:
opencode/packages/web/src/content/docs/cli.mdx:325-333
mDNS Service Discovery
With mDNS enabled, devices on the same LAN can access the server via .local domain:
opencode web --mdnsOutput:
  Local access:      http://localhost:4096
  Network access:    http://192.168.1.100:4096
mDNS: opencode.localNotes:
- mDNS only works when hostname is not a loopback address
- Actual mDNS name format published is
opencode-{port} - Requires network to support mDNS (most home/office networks do)
Source:
opencode/packages/opencode/src/server/server.ts:2853-2862
Network Proxy Configuration
OpenCode supports standard proxy environment variables:
# HTTPS proxy (recommended)
export HTTPS_PROXY=https://proxy.example.com:8080

# HTTP proxy
export HTTP_PROXY=http://proxy.example.com:8080

# Addresses to bypass proxy (must include local addresses)
export NO_PROXY=localhost,127.0.0.1
⚠️ Important: TUI communication with local server must bypass proxy, otherwise connection will fail.
Proxy Authentication
If the proxy requires authentication, include credentials in the URL:
export HTTPS_PROXY=http://username:[email protected]:8080⚠️ Avoid hardcoding passwords in scripts. Use environment variables or secure credential storage.
Source:
opencode/packages/web/src/content/docs/network.mdx:10-45
Custom Certificates
In enterprise environments using self-signed CA certificates, configure Node.js to trust them:
export NODE_EXTRA_CA_CERTS=/path/to/ca-cert.pemThis applies to both proxy connections and direct API access.
Source:
opencode/packages/web/src/content/docs/network.mdx:49-57
API Documentation Entry
The server publishes OpenAPI 3.1 specification, viewable in browser:
http://<hostname>:<port>/docFor example: http://localhost:4096/doc
You can use it to:
- View all available APIs
- Generate client code
- Explore in Swagger tools
See 5.9b API Reference for complete API documentation.
Common Pitfalls
| Issue | Cause | Solution |
|---|---|---|
| Remote connection fails | Firewall blocking | Open the corresponding port (e.g., 4096) |
| CORS error | Origin not configured | Add --cors <your-origin> or config file |
| Port conflict | Default port in use | Use --port to specify another port |
| Local connection fails | Proxy intercepting local requests | Set NO_PROXY=localhost,127.0.0.1 |
| mDNS not working | hostname is loopback | Use --hostname 0.0.0.0 |
| HTTPS certificate error | Enterprise self-signed cert | Set NODE_EXTRA_CA_CERTS |
Lesson Summary
You learned:
- serve command: Start headless HTTP service
- web command: Start service with Web interface
- attach command: Connect remotely to running server
- run --attach: Reuse server in automation scripts
- Configuration file: Set server parameters via
serverblock - Network config: Proxy and custom certificate settings
Related Resources
- 5.9b API Reference - Complete HTTP API documentation
- 5.10 SDK - JavaScript/TypeScript SDK
- CLI Commands - Complete command reference
Next Lesson Preview
In the next lesson, we'll learn the complete HTTP API interface and how to interact with OpenCode programmatically.