Interface & Basic Operations
💡 One-sentence Summary: Master
@file references,!command execution, and/slash commands, and you'll be able to harness OpenCode.
📝 Course Notes
Key knowledge points from this lesson:
What You'll Be Able to Do
- Understand every area of the TUI interface
- Use
@to reference project files - Use
!to execute system commands - Use
/to call slash commands - Remember the most commonly used shortcuts
Your Current Challenge
- Opened OpenCode, but don't know what each part of the interface does
- Know you can chat with AI, but don't know how to make it read files
- Don't know about shortcut operations, can only communicate by typing
When to Use This
- When you need to: Efficiently use OpenCode for daily tasks
- And you don't want to: Type long paragraphs to explain context every time
🎒 Before You Start
Make sure you've completed the following:
- [ ] Completed 1.4 Connect Model
- [ ] OpenCode can have normal conversations with AI
Core Concepts
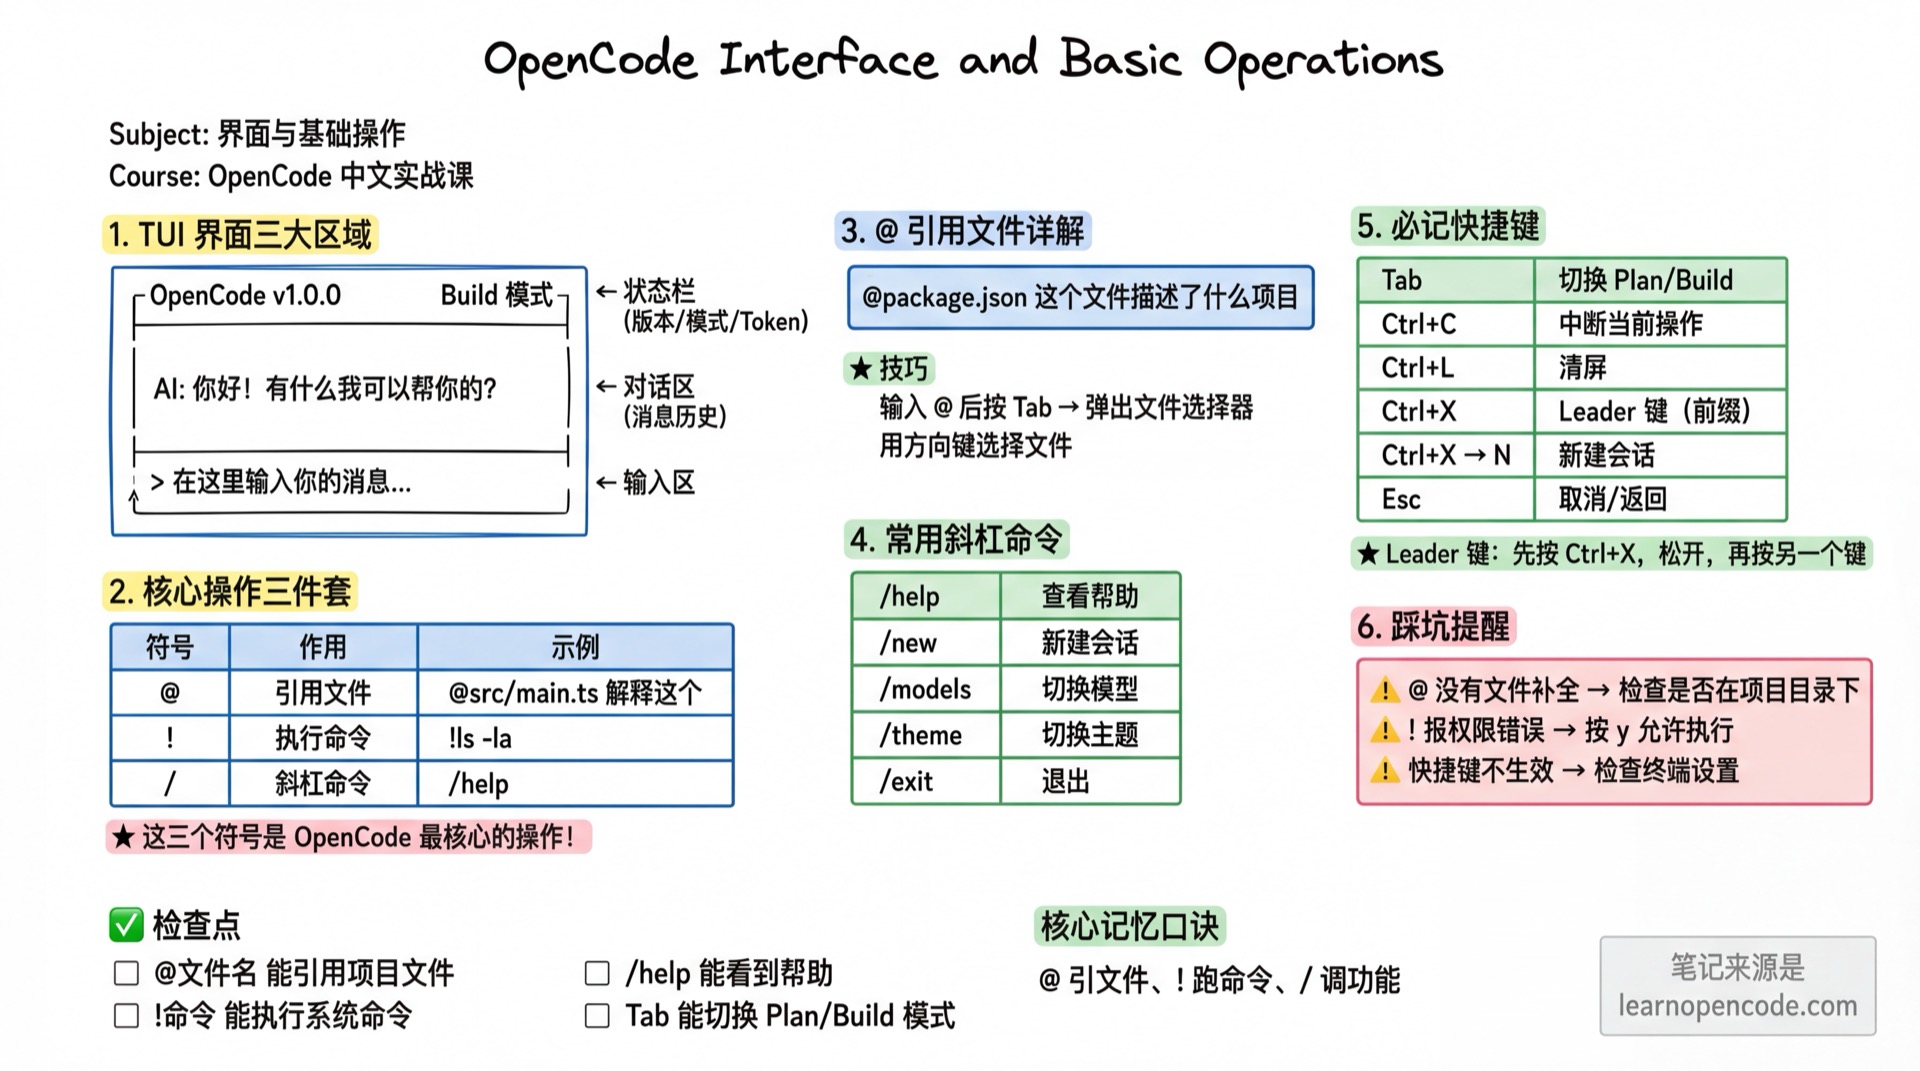
TUI Interface Overview
After starting OpenCode, you'll see an interface like this:
┌─────────────────────────────────────────────────┐
│  OpenCode v1.0.0                    Build Mode  │  ← Status Bar/Header
├─────────────────────────────────────────────────┤
│                                                 │
│  AI: Hello! How can I help you?                 │  ← Chat Area
│                                                 │
├─────────────────────────────────────────────────┤
│  > Ask something...                             │  ← Input Area
└─────────────────────────────────────────────────┘| Area | Purpose |
|---|---|
| Status Bar/Header | Shows version, current mode (Plan/Build), Token usage |
| Sidebar | Session list (auto-shows on wide screens, hides on narrow) |
| Chat Area | AI responses and your message history |
| Input Area | Where you type messages (different modes have different prompts) |
🆕 v1.1.57~v1.1.60 New Features
1. Sidebar Auto Show/Hide (v1.1.57)
- Auto-shows session list on wide screens (>120 columns)
- Auto-hides on narrow screens to save space
- Can be toggled manually via
session.toggle.sidebarcommand
2. Input Box Smart Prompts (v1.1.58)
- Different modes show different placeholder prompts
- Normal mode:
Ask something... - Shell mode:
Enter shell command... - Comment summary mode:
Summarize comments...
3. Hide Session Header (v1.1.60)
- Can hide the top status bar via command palette
- Useful when you need more chat space
- Search
session.toggle.headerto toggle
Core Operations Trio
| Symbol | Purpose | Example |
|---|---|---|
@ | Reference file | @src/main.ts What does this file do |
! | Execute command | !ls -la to view directory |
/ | Slash command | /help to view help |
Follow Along
Step 1: Start OpenCode and Enter Your Project
Why
Only by starting in the project directory can AI see your code files.
cd ~/your-project  # Replace with your project path
opencode
Step 2: Let AI Introduce Itself
Why
Verify that basic conversation functionality works.
In the input area, type:
Hello, please briefly introduce yourselfPress Enter to send.
You should see: AI responds with a self-introduction
Step 3: Use @ to Reference Files
Why
This is OpenCode's most powerful feature—letting AI directly read your files.
Type:
@package.json What project does this file describe💡 Search Completion
After typing @, you'll see an Agent list (like @explore) and folders. Continue typing part of the filename (like @pack), and it will search and show matching files. Use arrow keys to select and press Enter to confirm.
You should see: AI analyzes the package.json content and responds
Step 4: Use ! to Execute Commands
Why
Lets AI see the execution results of commands.
Type:
!ls -laYou should see: The file list of the current directory appears in the chat
You can also ask AI to execute commands:
Help me see what files are in the current directoryAI will automatically call the appropriate tool to execute.
Step 5: Use / to Call Slash Commands
Why
Slash commands are the entry point for OpenCode's built-in features.
Type:
/helpYou should see: A list of all available slash commands
Common slash commands overview:
| Command | Purpose |
|---|---|
/help | View help |
/new | New session |
/models | Switch model |
/theme | Switch theme |
/exit | Exit |
💡 Interface Customization Commands
Search in the command palette (Ctrl+X):
session.toggle.sidebar- Toggle sidebar displaysession.toggle.header- Toggle header display
Step 6: Learn Common Shortcuts
Why
Shortcuts make you faster.
| Shortcut | Purpose |
|---|---|
| Tab | Toggle Plan/Build mode |
| Ctrl+C | Interrupt current operation |
| Ctrl+L | Clear screen |
| Ctrl+X | Leader key (prefix key) |
| Ctrl+X N | New session |
| Esc | Cancel/Go back |
📦 What is a Leader Key
A Leader key is a shortcut combination method. First press Ctrl+X, release, then press another key.
For example: Ctrl+X then N = New session
This allows more shortcut combinations without conflicting with system shortcuts.
Checklist ✅
All items must pass before continuing
- [ ] Can reference project files with
@filename - [ ] Can execute system commands with
!command - [ ] Can see help information with
/help - [ ] Tab key can toggle Plan/Build mode
Common Pitfalls
| Issue | Cause | Solution |
|---|---|---|
No file completion after @ | Not in project directory | cd to project directory and restart |
! command permission error | OpenCode blocked dangerous command | Confirm command is safe then press y to allow |
| Shortcuts not working | Terminal hijacked the keys | Check terminal settings or try another terminal |
Lesson Summary
You learned:
- Three areas of the TUI interface (status bar, chat area, input area)
- Core operations trio (
@reference,!execute,/command) - Most commonly used shortcuts
Next Lesson Preview
Next lesson we'll learn How to Copy Content.
You'll learn:
- Why Ctrl+C doesn't copy
- How to copy with mouse on Win/Mac
- How to copy AI's long code blocks