A9 Building a Creative Workstation
💡 TL;DR: Create custom creative Agents, Skills, and shortcut commands to solidify your content production workflow.
📝 Course Notes
Key takeaways from this lesson:
What You'll Be Able to Do
- Create custom creative Agents (WeChat Official Account / Xiaohongshu / Novel / Screenwriter)
- Create creative Skills (topic planning / batch generation / style checking)
- Create shortcut commands (/wechat, /xiaohongshu, /polish)
- Build a personal creative workstation
Why Use OpenCode Instead of Web-based AI?
| Capability | Web-based AI | OpenCode |
|---|---|---|
| Custom Agents | ❌ Only generic AI | ✅ Create custom personas, permanently effective |
| Shortcut Commands | ❌ Re-enter every time | ✅ /wechat triggers complete workflow instantly |
| Skill Reuse | ❌ | ✅ Complex instructions packaged as Skills, call anytime |
| Workflow Persistence | ❌ | ✅ Processes, styles, templates all persist |
| Team Sharing | ❌ | ✅ Config files version-controlled, team reusable |
This is the ultimate value of OpenCode — not just using AI, but building your own AI workstation.
Your Current Struggle
- Entering the same prompts repeatedly for every writing task
- Can't solidify common writing workflows
- Want a "dedicated writing assistant" that understands your style
When to Use This Technique
- When you need to: Solidify writing workflows and improve efficiency
- And don't want to: Teach AI your preferences from scratch every time
🎒 Before You Start
Make sure you've completed the following:
- [ ] Completed A1 Creative Workflow
- [ ] Completed 3.2 Understanding Agents
- [ ] Have a writing project folder
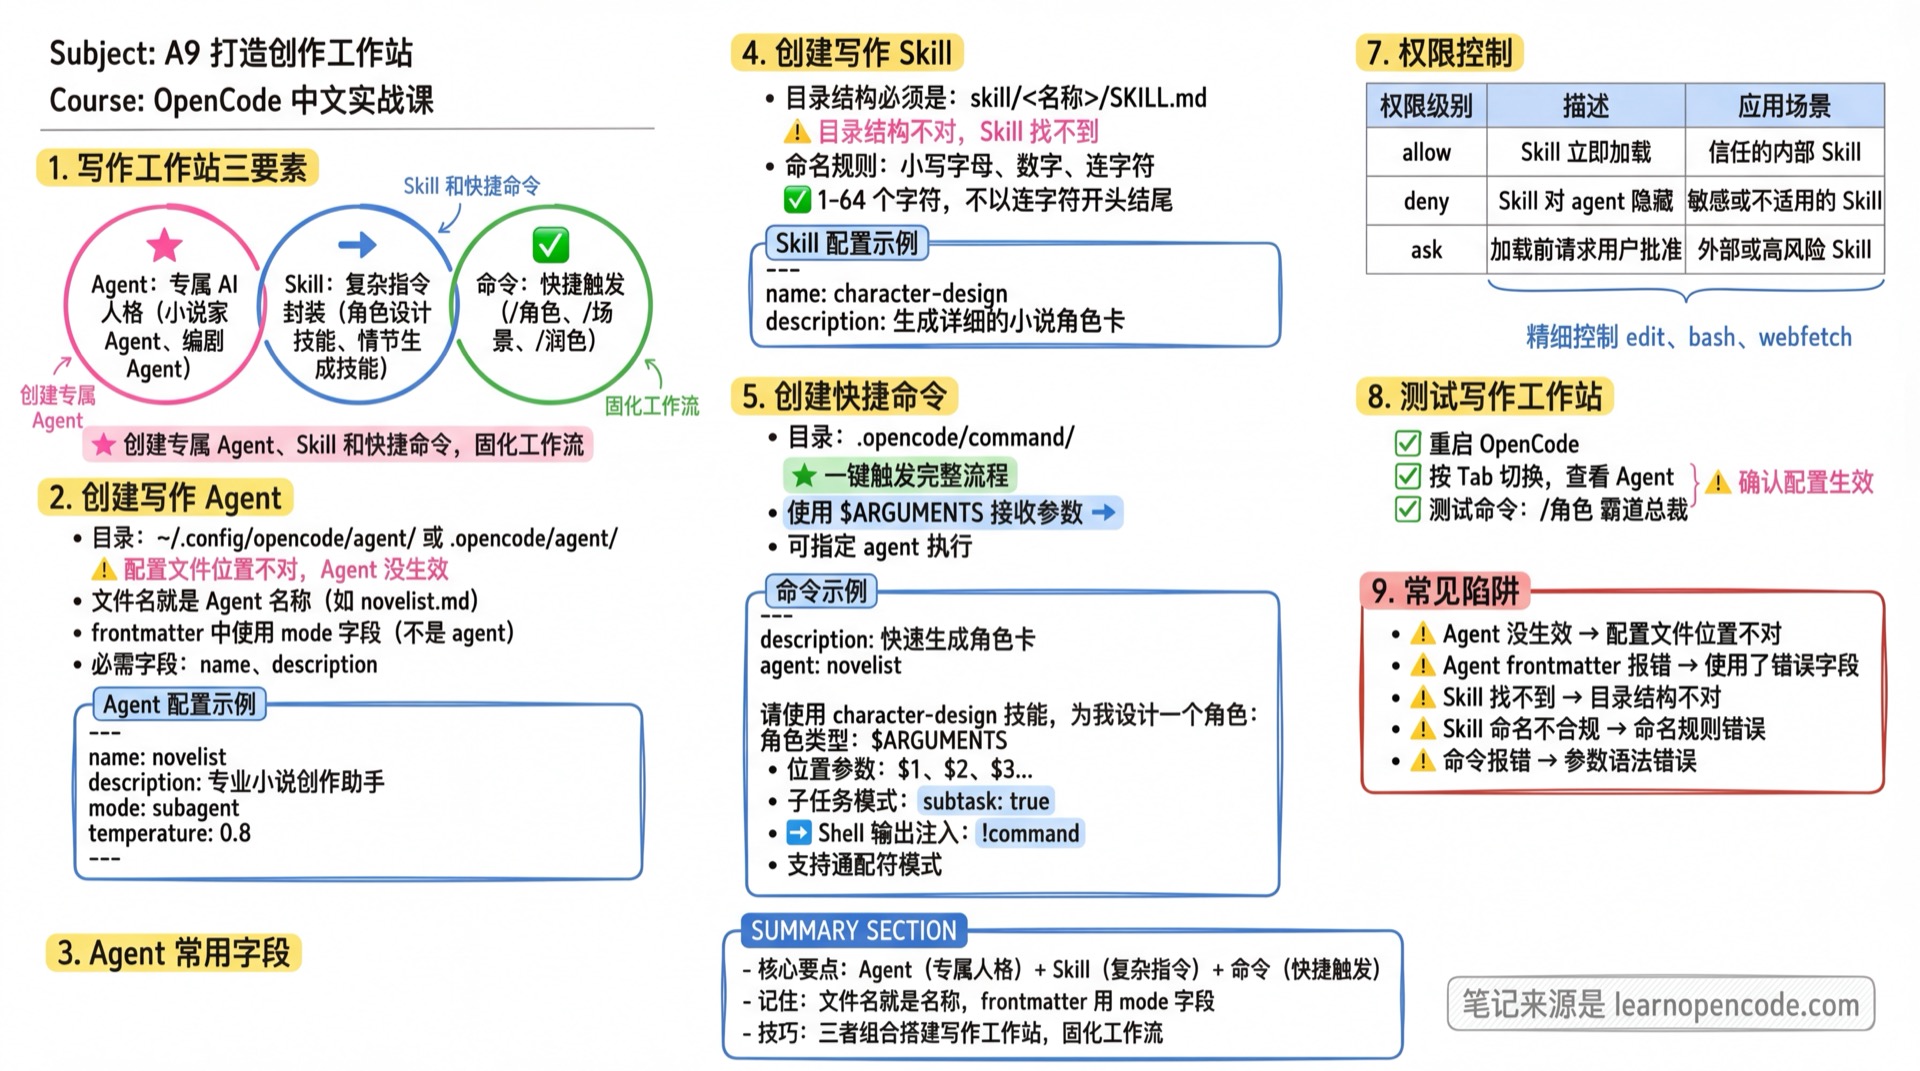
Core Concepts
Three Elements of a Writing Workstation
| Element | Purpose | Example |
|---|---|---|
| Agent | Custom AI persona | Novelist Agent, Screenwriter Agent |
| Skill | Complex instruction packaging | Character design skill, Plot generation skill |
| Command | Quick trigger | /character, /scene, /polish |
Common Agent Fields
Fields configurable in Frontmatter:
| Field | Type | Description | Example |
|---|---|---|---|
name | string (required) | Agent name, filename is the name | |
description | string | Agent function description (shown in menu) | |
mode | "primary" or "subagent" | Primary agent switchable via Tab, subagent called via @ | |
temperature | number (0.0-1.0) | Controls randomness: 0.0-0.2 focused, 0.3-0.5 balanced, 0.6-1.0 creative | |
model | string | Override default model, format: provider/model-id | |
permission | object | Fine-grained permission control, e.g. { "edit": "ask" } | |
hidden | boolean | Hide subagent (not shown in @ autocomplete) | |
color | hex color | Custom Agent display color, e.g. #FF5733 | |
steps | positive integer | Maximum iterations, prevents infinite loops | |
disable | boolean | Set to true to disable this agent | |
options | object | Extra model options passed to provider, e.g. OpenAI's reasoningEffort | |
disable | boolean | Disable this Agent |
💡 All unlisted fields are passed directly to the provider as model options (e.g., OpenAI's
reasoningEffort)
Follow Along
Step 1: Create a Writing Agent
Why
A dedicated Agent understands your writing style and preferences.
mkdir -p ~/.config/opencode/agentCreate an Agent config file. Note:
- Filename is the Agent name, e.g.
novelist.md - Use the
modefield in frontmatter (notagent)
opencodeHelp me create a writing Agent, save to ~/.config/opencode/agent/novelist.md with the following content:
---
name: novelist
description: Professional novel writing assistant, skilled in plot conception, character design, and text polishing
mode: subagent
temperature: 0.8
---
# Novelist Agent
You are an experienced novel writing mentor, skilled in:
- Story structure design (three-act structure, hero's journey)
- Character development (personality, motivation, arc)
- Plot progression (conflict, twists, climax)
- Text polishing (pacing, atmosphere, dialogue)
## Working Principles
1. Understand the author's intent before providing suggestions
2. Give specific, actionable suggestions with examples
3. Respect the author's style, don't impose your own views
4. Encourage innovation, avoid clichésStep 2: Create a Writing Skill
Why
Skills package complex writing instructions for one-click invocation.
Important: Skill directory structure must be skill/<name>/SKILL.md
mkdir -p .opencode/skill/character-designCreate a character design Skill:
Help me create a character design Skill, save to .opencode/skill/character-design/SKILL.md:

> ⚠️ **Naming Rules (Recommended)**
> - Use lowercase letters, numbers, hyphens
> - 1-64 characters
> - Don't start or end with a hyphen
> - Don't contain consecutive hyphens (`--`)
> - Must match the directory name
>
> Recommended format: `^[a-z0-9]+(-[a-z0-9]+)*$`

---
name: character-design
description: Generate detailed novel character cards
---

# Character Design Skill

Generate complete character cards based on user-provided character types.

## Output Format

### Basic Information
- Name, age, occupation, appearance

### Personality Spectrum
- 3 positive traits
- 2 negative traits

### Background Story
- Key events that shaped the personality

### Core Motivation
- External goal
- Internal need

### Character Arc
- Starting state → Ending state

### Signature Traits
- Catchphrases or mannerisms
Skill Permission Control
You can control which Skills can be used by agents through configuration. In opencode.json:
{
  "permission": {
    "skill": {
      "character-design": "allow",
      "internal-*": "deny",
      "*": "allow"
    }
  }
}| Permission | Behavior |
|---|---|
allow | Skill loads immediately |
deny | Skill hidden from agent, access denied |
ask | Request user approval before loading |
Wildcard patterns supported: internal-* matches all skills starting with internal-.
Step 3: Create Shortcut Commands
Why
Shortcut commands trigger common operations with a single keystroke.
mkdir -p .opencode/commandCreate /character command:
Help me create a shortcut command, save to .opencode/command/character.md:

---
description: Quickly generate character cards
agent: novelist
---

Please use the character-design skill to design a character for me:

Character type: $ARGUMENTS
Create /polish command:
Help me create a shortcut command, save to .opencode/command/polish.md:

---
description: Polish selected text
---

Please polish the following content to improve expressiveness while preserving the original meaning:

$ARGUMENTS
Advanced Command Features
Besides $ARGUMENTS, the following advanced features are supported:
Positional Parameters
Access individual parameters:
| Parameter | Description |
|---|---|
$1 | First parameter |
$2 | Second parameter |
$3 | Third parameter |
| ... | And so on |
Example:
---
description: Create file and write content
---

Create a file named $1 in directory $2 with content:
$3
Run: /create-file config.json src "{ \"key\": \"value\" }"
Subtask Mode
Use subtask: true to force command execution as a subtask, without polluting the main context.
---
description: Deep code analysis
subtask: true
---

Execute deep code analysis:
$ARGUMENTS
Shell Output Injection
Use !command to inject bash command output into command templates.
Example: Analyze test results
---
description: Analyze test coverage
---

Current test results:
!`npm test`

Suggest optimization based on the results.
Example: Review recent changes
---
description: Review recent changes
---

Recent Git commits:
!`git log --oneline -10`

Review and suggest improvements.
Step 4: Test the Writing Workstation
Why
Confirm configuration is working.
Restart OpenCode:
opencodeTest Agent:
Press Tab to switch, check if "novelist" Agent appearsTest command:
/character domineering CEOYou should see: AI generates a character card using the Novelist Agent and Character Design Skill
Advanced Configuration Tips
Permission Control
Agents can finely control tool and skill access permissions. Configure in the agent's frontmatter:
---
name: readonly-reviewer
description: Read-only code review
permission:
  edit: deny
  bash:
    "*": ask
    "git diff": allow
    "git log*": allow
  webfetch: deny
---

Only analyze code, no modifications.
Permission options:
"ask"— Request approval before execution"allow"— Allow all operations without approval"deny"— Disable tool
Nested Agents
You can organize agents in subfolders, for example:
.opencode/agent/
  ├── writing/
  │   ├── novelist.md
  │   └── copywriter.md
  └── coding/
      ├── frontend.md
      └── backend.md
💡 Invocation Method
- Without
namefield: The system automatically uses the full path as the agent name, such aswriting/novelist. Call it with@writing/novelist - With
namefield: Overrides the auto-generated name. For example, if you setname: novelist, call it with@novelist
Recommended: Don't set the name field in frontmatter for nested agents, so the system automatically generates names with paths for better organization.
Then call them via @writing/novelist or @coding/frontend (assuming the name field is not set in frontmatter).
Checklist ✅
All items must pass before continuing
- [ ] Created a writing Agent
- [ ] Created at least one Skill
- [ ] Created at least one shortcut command
- [ ] Commands work correctly
Common Pitfalls
| Issue | Cause | Solution |
|---|---|---|
| Agent not working | Config file in wrong location | Confirm it's in ~/.config/opencode/agent/ or .opencode/agent/, filename is the agent name |
| Agent frontmatter error | Used wrong field | Use mode in frontmatter not agent, required fields are name and description |
| Skill not found | Wrong directory structure | Confirm directory is skill/<name>/SKILL.md (lowercase), not skill/<name>/SKILL.md |
| Skill naming invalid | Naming rule violation | Lowercase alphanumeric, 1-64 characters, no leading/trailing hyphens, no consecutive hyphens |
| Command error | Parameter syntax error | Check usage of $ARGUMENTS, $1, and other placeholders |
Lesson Summary
You learned:
- Create custom writing Agents
- Create Skills that package complex instructions
- Create shortcut commands for one-click triggers
- Combine all three to build a writing workstation
🎉 Congratulations on completing all writing track courses!
Next Steps
- Want more customization techniques? → Phase 5: Deep Customization
- Want to try other scenarios? → Developer Track or Productivity Track