Understanding Agents: Your Dedicated Team
💡 One-sentence Summary: Agents are like specialists in different trades. Use Tab to switch Primary Agents, and
@agent-nameto invoke Subagents.
📝 Course Notes
Key takeaways from this lesson:
What You'll Be Able to Do
- Understand what Agents are (Primary vs Subagent)
- Know what each built-in Agent specializes in
- Invoke different Agents to complete tasks
- Navigate between parent and child sessions
Your Current Challenge
- You always talk to the same AI, unaware of other "experts" available
- When facing complex tasks, you don't know how to make multiple AIs collaborate
- You've heard of Agents but don't know how to use them specifically
When to Use This Technique
- When you need: Let specialized AIs handle specialized tasks
- And you don't want: Throw every task at the same general-purpose AI
🎒 Before You Start
Make sure you've completed the following:
- [ ] Completed 3.1 Plan vs Build
- [ ] Have a project directory ready
Core Concepts
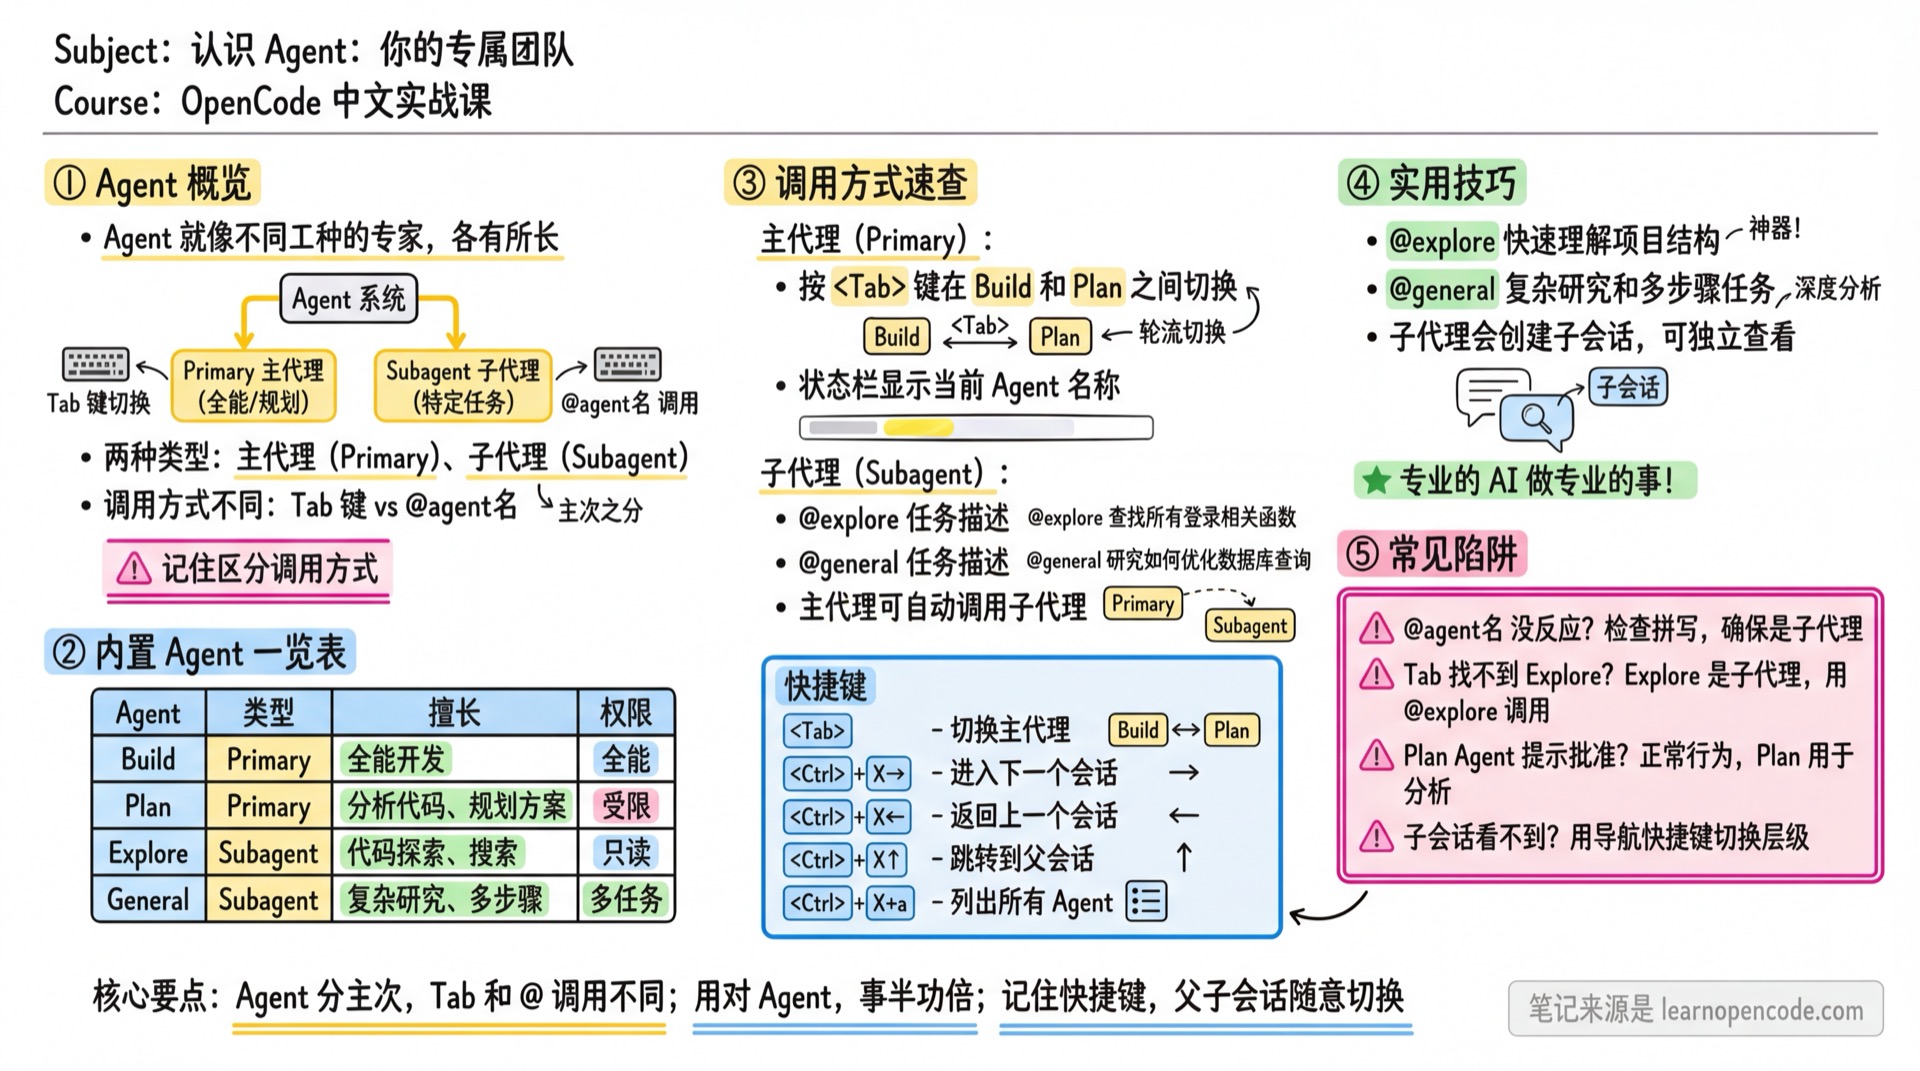
What is an Agent
Agents are like your AI team members, each with different specializations:
- Build Agent: Full-stack developer, can read/write files and execute commands
- Plan Agent: Planning analyst, mainly for code analysis and suggestions (can write to
.opencode/plans/*.mdto save plans) - Explore Agent: Code explorer, quickly understands codebase structure
- General Agent: General assistant, excels at complex research and multi-step tasks
Two Types
| Type | Description | How to Invoke |
|---|---|---|
| Primary Agent | The Agent you directly converse with (Build, Plan) | Tab to switch |
| Subagent | Experts invoked automatically by Primary Agents or manually by you (Explore, General) | @agent-name task |
Built-in Agents Overview
| Agent | Type | Specializes In | Default Permissions |
|---|---|---|---|
| Build | Primary | Full-stack development (default Primary Agent) | Full access (can read/write files, execute commands) |
| Plan | Primary | Code analysis, planning, review suggestions | Restricted (editing disabled by default, only .opencode/plans/*.md allowed) |
| Explore | Subagent | Quickly find files, search code, answer codebase questions | Read-only (can search and browse code) |
| General | Subagent | Complex research, multi-step tasks, when uncertain if answer can be found quickly | Multi-task execution (can use Todo tool) |
🔧 Internal Agents (run automatically, no manual invocation needed)
OpenCode also has 3 hidden internal Agents that work automatically in the background:
| Agent | Purpose | Trigger |
|---|---|---|
| compaction | Context compression | Automatically compresses conversation history when approaching model context limits |
| title | Session title generation | Automatically generates descriptive titles after creating a new session |
| summary | Session summary generation | Generates summaries to replace history when compressing sessions |
You don't need to invoke them directly; OpenCode will use them automatically when needed.
Follow Along
Step 1: Check Current Agent
Why
Know which Agent is currently working.
Look at the status bar, it will display the current Agent name (e.g., Build or Plan).
Step 2: Switch Primary Agent with Tab
Why
Switch between Build Agent and Plan Agent.
Press Tab to switch.
Step 3: Invoke Explore Agent
Why
Let the specialized code exploration Agent help you understand the project.
Type:
@explore Help me understand the overall structure of this projectYou should see: Explore Agent starts working, analyzing the project structure
💡 Three Exploration Depths of Explore
When invoking Explore, the AI will automatically choose the exploration depth based on your task description. You can also specify in your prompt:
| Depth | Description | Best For |
|---|---|---|
| quick | Basic search, quick location | "Find where the config file is" |
| medium | Medium exploration, balance between speed and coverage | "Help me understand the project structure" |
| very thorough | Comprehensive analysis, searches across multiple locations and naming conventions | "Find all security-related code" |
For example, to do a thorough exploration:
@explore Thoroughly analyze the authentication and authorization implementation in this project, be very comprehensiveWhen the AI sees descriptions like "thoroughly" or "very comprehensive", it will automatically use the very thorough level.
💡 Subagent Sessions
After invoking a subagent, a child session is created. You can use <leader>→ to enter the child session and <leader>← to return to the parent session. (Default leader is Ctrl+X)
Step 4: Invoke General Agent
Why
General Agent excels at complex research and multi-step tasks.
Type:
@general Help me research the performance comparison between Node.js and Python, and output a summary reportYou should see: General Agent executes multiple research tasks in parallel and consolidates results
Step 5: Let Primary Agent Automatically Invoke Subagents
Why
Primary Agents automatically determine whether to invoke subagents based on task description and Agent descriptions.
Type a complex task:
Help me analyze this project's code structure, then add a README.mdYou should see: Build Agent might automatically invoke Explore Agent to analyze the project structure, then create the README itself
💡 Auto-invocation Rules
Primary Agents decide when to invoke based on subagent description. For example, Explore's description is "quickly find files, search code", so it gets invoked when tasks involve searching or exploring the codebase.
Step 5.5: View Agent List
Why
Know which Agents are currently available.
Press <leader>a to list all Agents (default leader is Ctrl+X, i.e., Ctrl+X+a)
You should see:
- Primary Agents: build, plan
- Subagents: explore, general
- And any custom Agents you've created (if any)
Press Esc to exit the list.
Step 6: Navigate Between Parent and Child Sessions
Why
View the detailed work process of subagents, or switch between main and child sessions.
- Press
<leader>→to go to next session (Parent → Child1 → Child2 → ... → Parent) - Press
<leader>←to return to previous session (Parent ← Child1 ← Child2 ← ... ← Parent) - Press
<leader>↑to jump directly to parent session
Session Hierarchy Example:
Main Session (Build)
  └── Child Session (Explore)
        └── Grandchild Session (General)
Use navigation shortcuts to freely switch between multiple session layers.
💡 Default Shortcuts
leaderkey defaults toCtrl+X<leader>→=Ctrl+X+→(right arrow)<leader>←=Ctrl+X+←(left arrow)<leader>↑=Ctrl+X+↑(up arrow)
Checklist ✅
Must pass all items to continue
- [ ] Know which Agent is currently active (check status bar)
- [ ] Can switch between Build and Plan using Tab
- [ ] Can invoke subagents using
@exploreand@general - [ ] Can switch between parent and child sessions using shortcuts
Common Pitfalls
| Symptom | Cause | Solution |
|---|---|---|
@agent-name has no response | Agent name is misspelled or not a subagent | Check spelling, built-in subagents are explore, general. Primary Agents (build, plan) can only be switched with Tab |
| Child session not visible | Not expanded or navigated to wrong level | Use <leader>→ / <leader>← to navigate, or press <leader>↑ to return to parent |
| Want to switch to Explore but Tab can't find it | Tab only switches between Primary Agents | Explore is a Subagent, can only be invoked with @explore |
| Can't find subagent after interruption | Session may have closed or navigated to wrong level | Press <leader>↑ to return to parent, then use <leader>→ to search |
| Plan Agent asks "allow editing?" | Plan Agent defaults to ask for file modifications and command execution | This is normal behavior; Plan is for analysis and will request approval before executing operations |
| General Agent not executing multi-step tasks | Task description not clear enough or task not complex enough | Clearly state which steps need to be executed in your prompt, or ensure the task actually requires multiple steps |
Lesson Summary
You learned:
- What Agents are (AI team members with different specializations)
- Switch Primary Agents with Tab, invoke Subagents with
@agent-name - Navigate between parent and child sessions with shortcuts
📚 Deep Dive
Want to create your own Agents or learn more about Agent configuration? → Continue reading 5.2a Agent Quick Start
Next Lesson Preview
In the next lesson, we'll learn about project initialization, using
/initto help AI understand your project better.