Third-Party Relay (Claude Code Compatible)
📝 Course Notes
Key takeaways from this lesson:
This page does one thing: connect a third-party relay that "claims Claude Code compatibility" to OpenCode.
What You'll Be Able to Do
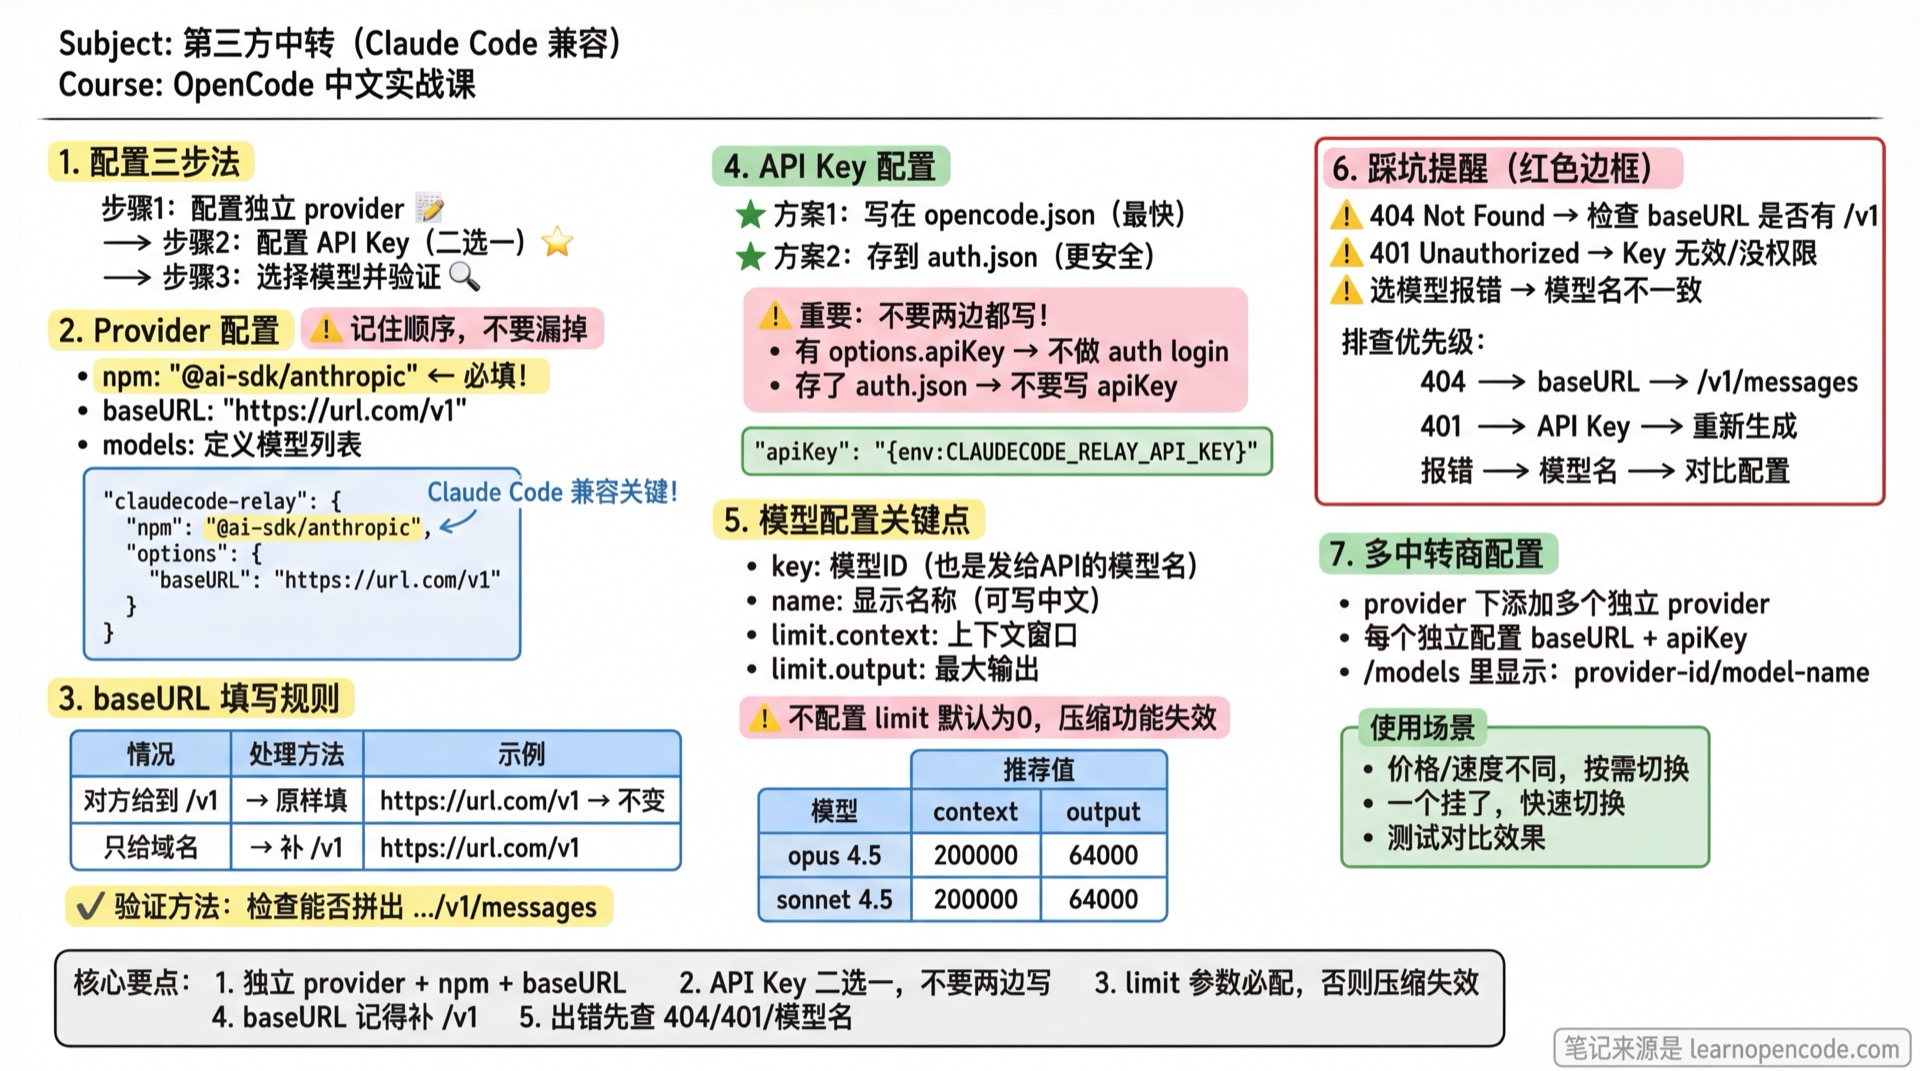
You will complete 3 tasks:
- Configure an independent provider (e.g.,
claudecode-relay) pointingbaseURLto the relay's.../v1 - Configure API Key (Choose one: write in
opencode.jsonor store inauth.json) - Select model in
/modelsand verify with a test message
🎒 Before You Start
- [ ] Completed 1.2 Installation, able to run
opencode - [ ] You have obtained
baseURLandAPI Keyfrom the relay service
Get two things from the relay service:
- baseURL: The interface address provided by the relay
- API Key: Usually in the format
k-...
Rules for filling in baseURL (two common formats):
- If given up to
/v1, use as-is: e.g.,https://url.com/v1 - If only domain is given, append
/v1: e.g.,https://url.com→https://url.com/v1
Tip: Many Claude/Anthropic compatible relay message interfaces include
.../v1/messagesin the path, which you can use to verify if baseURL is missing/v1.
Follow Along
Step 1: Configure an Independent Provider in opencode.json
Edit ~/.config/opencode/opencode.json and add a custom provider (using claudecode-relay as the provider ID here):
{
  "$schema": "https://opencode.ai/config.json",
  "provider": {
    "claudecode-relay": {
      "npm": "@ai-sdk/anthropic",
      "options": {
        "baseURL": "https://url.com/v1"
      },
      "models": {
        "claude-opus-4-5-20251101": {
          "name": "Relay's opus 4.5",
          "limit": {
            "context": 200000,
            "output": 64000
          },
          "modalities": {
            "input": ["text", "image"],
            "output": ["text"]
          },
          "options": {
            "thinking": {
              "type": "enabled",
              "budgetTokens": 16000
            }
          }
        }
      }
    }
  }
}
Notes:
npmtells OpenCode which "protocol/SDK driver" to use for requests. Claude/Anthropic compatible relays typically use@ai-sdk/anthropic; if you remove this line, OpenCode may treat the provider as OpenAI-compatible by default, causing request failures.- You can also modify
provider.anthropicdirectly to use the relay; this essentially uses the same Anthropic protocol, but is not recommended (see "Supplementary Notes" at the end). - The configured key (e.g.,
claude-opus-4-5-20251101) is both the "model ID" you see in OpenCode and the model name sent to the relay API models.<key>.nameis the display name, you can write it in any language (e.g., "Relay's opus 4.5")limit.contextandlimit.outputdefine the model's context window and maximum output length. If not configured, defaults to 0, which disables auto-compaction. Recommended values in the table below.
| Model | context | output |
|---|---|---|
| claude-opus-4-5 | 200000 | 64000 |
| claude-sonnet-4-5 | 200000 | 64000 |
💡 Want to learn more about context compression and the
limitparameter? See 5.20 Context Compression.
Optional: For Image Input, modalities Must Be at Model Level
If you want the model to receive image input, modalities must be written in models.<modelID>.modalities, not at provider level, and not inside options.
✅ Correct (will work):
{
  "provider": {
    "claudecode-relay": {
      "models": {
        "claude-opus-4-5-20251101": {
          "modalities": {
            "input": ["text", "image"],
            "output": ["text"]
          },
          "options": {
            "thinking": {
              "type": "enabled",
              "budgetTokens": 16000
            }
          }
        }
      }
    }
  }
}
❌ Common mistakes:
provider.claudecode-relay.modalities(too shallow, will cause config error)provider.claudecode-relay.models.<modelID>.options.modalities(too deep, no error but won't work)
Step 2: Configure API Key (Choose One)
You only need to choose one of the following methods:
Option 1: Write Key in opencode.json (Simplest)
Method A: Write Key Directly (Fastest)
{
  "provider": {
    "claudecode-relay": {
      "options": {
        "baseURL": "https://url.com/v1",
        "apiKey": "your-api-key"
      }
    }
  }
}
Just paste the key from the relay provider.
Security Note
The key will be stored in plain text in the config file. If security is a concern, use Method B.
Method B: Use Environment Variable (More Secure)
If you don't want to store the key in plain text, use an environment variable:
{
  "provider": {
    "claudecode-relay": {
      "options": {
        "baseURL": "https://url.com/v1",
        "apiKey": "{env:CLAUDECODE_RELAY_API_KEY}"
      }
    }
  }
}
Then add to your shell config file (~/.bashrc or ~/.zshrc):
export CLAUDECODE_RELAY_API_KEY="your-api-key"After saving, run source ~/.bashrc (or restart terminal) for the environment variable to take effect.
Option 2: Store Key in OpenCode Authentication (auth.json)
Run:
opencode auth loginIn the interactive interface:
- Select
Other - Enter provider ID:
claudecode-relay - Paste your API Key
It will write the key to OpenCode's authentication file auth.json. You can use the following command to see "where it was actually written" (the path will be shown in the output):
opencode auth listImportant: Don't Write in Both Places
To avoid "thinking you changed the key but it didn't take effect", keep only one method.
- If you chose Option 1 (
opencode.jsonhasoptions.apiKey), don't doauth login. - If you chose Option 2 (store in
auth.json), don't writeoptions.apiKeyinopencode.json.
Reason: When options.apiKey exists in opencode.json, it takes priority.
Step 3: Select Model and Verify
Start OpenCode:
opencodeEnter:
/modelsSelect claudecode-relay/claude-opus-4-5-20251101, then send a test message:
Hello, please briefly introduce yourselfChecklist ✅
- [ ] Can see
claudecode-relay/...in/modelsand select it successfully - [ ] Sending a message receives an AI response
Common Issues
| Symptom | Cause | Solution |
|---|---|---|
| 404 / Not Found | Wrong baseURL | First check if baseURL should be .../v1, and confirm it forms .../v1/messages |
| 401 / Unauthorized | Invalid/no permission Key | Regenerate key, or check plan/permissions |
| Error when selecting model | Model name not supported | Check if configured key (e.g., claude-opus-4-5-20251101) exactly matches the relay's model name |
Unrecognized key: "modalities" provider.xxx | modalities at provider level | Move to provider.xxx.models.<modelID>.modalities |
this model does not support image input | modalities in options or not configured | Use model level: models.<modelID>.modalities.input includes image |
Configuring Multiple Relay Providers
OpenCode supports configuring multiple relay providers simultaneously. You can add multiple independent providers under provider:
{
  "provider": {
    "relay-a": {
      "npm": "@ai-sdk/anthropic",
      "options": {
        "baseURL": "https://relay-a.com/v1",
        "apiKey": "your-relay-a-key"
      },
      "models": {
        "claude-opus-4-5-20251101": {
          "name": "Relay A's opus 4.5",
          "limit": {
            "context": 200000,
            "output": 64000
          }
        }
      }
    },
    "relay-b": {
      "npm": "@ai-sdk/anthropic",
      "options": {
        "baseURL": "https://relay-b.com/v1",
        "apiKey": "your-relay-b-key"
      },
      "models": {
        "claude-sonnet-4-5-20250514": {
          "name": "Relay B's sonnet 4.5",
          "limit": {
            "context": 200000,
            "output": 64000
          }
        }
      }
    }
  }
}
After configuration, you can see in /models:
relay-a/claude-opus-4-5-20251101relay-b/claude-sonnet-4-5-20250514
Use Cases:
- Different relays have different prices/speeds, switch as needed
- One relay is down, quickly switch to another
- Test and compare results from different relays
Supplementary Notes: Why Not Modify provider.anthropic Directly
You can certainly put the relay in provider.anthropic, but it's not recommended:
- It will also replace your original
anthropicconfig with the relay (not good for switching back to official or comparing/troubleshooting) - Easier to store the key to the wrong providerID during
opencode auth login(e.g., mistakenly storing asanthropic), making troubleshooting more complex
Using an independent providerID (e.g., claudecode-relay in this chapter) isolates "relay config" from "official anthropic config".
Next Steps
- Return to 1.4 Overview to choose your next path, or proceed to 2.1 Interface & Basic Operations
Having Issues?
Stuck on relay configuration? Join the community and connect with 2000+ fellow learners for real-time Q&A.